![Veridiction Consulting, Independent Educational Consultant [Logo]](https://veridiction.com/wp-content/uploads/2025/07/cropped-cropped-Image-1.png)
Today we are going to set up our LinkedIn account that’s going to be our public-facing social media as we’re applying to colleges, then looking for internships, and hopefully starting a career or moving on to grad school. As we get started on this project, the important thing to remember about LinkedIn is that its tone is expected to be professionally aspirational and future-looking: when there is dissonance between where you are at and where you are going, prefer to focus on where you are going.
What LinkedIn Is
In case you missed the memo about this venerable social media platform: LinkedIn is the preferred social media of adults looking to do or present professional or academic work in a way that draws sponsorship or collaboration. Your profile on LinkedIn is going to have the appearance of an omnibus resume or CV in addition to the typical social media features of having a profile photo and posts on your newsfeed.
LinkedIn is particularly good in a few key ways:
- It allows for the structured enumeration of your professional skills and availability, making you easy for recruiters to find.
- It readily support attachments of and off-site links to your work that you want to promote on your feed.
- It facilitates finding people by institutional affiliation, slightly reducing the risk of connecting with scammers.
- It allows your connections — like your professors, your internship sponsors, or your boss — to endorse your work and skills.
- And it is popular means of social media at the professionally-directed universities (ex: Duke, RIT).
The Profile-Starting Process
Objective & Timing: For our college-preparation purposes, this activity should produce a bare-bones profile for you that you use to follow the college(s) you will be applying to and thus provide a signal of Demonstrated Interest. This activity should therefore be completed a at least a couple of weeks before you send out your application(s).
Go to https://www.linkedin.com/ and set up a profile using your preferred (non-burner) email address, quickly walking through their initial setup. (You can change your email address in the future under Settings → Sign-in & Security.) As always, 🛑never leave your direct contact information in a public place on the internet🛑, not even on a generic resume you might upload to LinkedIn.
While I’m about to provide you with a lot of advice aggregated from at least 4 different sources, note that you do have the option of shortcutting past this: just do a web search for “[university name] student newspaper” and then pick names off of bylines so you can use LinkedIn’s search to find their profiles — I was able to get from Google to a managing editor of Cornell’s student paper on LinkedIn within 2 minutes. By staring at their profiles you can see what sort of information to include and tone to establish for your own profile.
If you’re still with me, here’s the more-specific process.
Set Your Profile Photo
- Focus on you: Choose a profile photo that is well-lit and cropped to your smiling face. If you’re getting Senior Photos done, then plan to get one photo you can use for this purpose.
- Look professional: This is a “dress for the job you want” situation, even if we only see the collar of your outfit.
- Simple pose: Just look into the camera. While some industries have statistical preferences for certain angles, they are inscrutable and inconsistent so prefer to keep it simple.
- Personal branding: To ensure the strength of your brand across professional spaces, use this same photo on other profiling sites you sign up for — you want to be consistently identifiable. When you update one, update them all.
- There is a privacy restriction button (eyeball) in the lower-left corner of the photo selector. You may want your photo to be restricted to “Only LinkedIn Members” to limit how far your face goes from your profile without you.
Select a Background Banner
The background banner is really just a matter of showing care and attention by not leaving it in its default state. You can fuss more over choosing something suitably representative of your interests or mindset in the future.
Write Your Headline
Your headline probably says “Student at [School]” which is simply not good enough. Click the edit pencil to the right, scroll down to Headline and add some appropriate details. How you write your headline will evolve over time, but for now I’d suggest using: your top academic interest, a secondary fascination or skill, and something else you do (with a word ending in -er), along with your school and graduation year after a pipe (|) to separate your actions from your affiliations. That can look like this:
- Student of psychology, cybernetics enthusiast, occasional bass player | Cleveland High School, Class of 2026
- Economics student, soccer goalie, potato blight preventer | Lakeview High School, Class of 2027
You can update the institutional affiliation once you’re enrolled in college and update the blurb once you feel good about your choice of major (and have survived at least a semester of classes).
Further in the future, you will want to update your headline to more closely match the title of a job or positions you are pursuing. Remembering that LinkedIn is aspirational, you can project into the future a bit with a headline like “Future Director of North American Marketing” or the cheeky “Your Next Social Media Campaign Coordinator.”
Overall: keep your headline updated to reflect where you are going. And when you can see the future that you want, put that in you headline exactly matching word-for-word.
Add Your Education
You should already have an education section on your profile because you started as a student. On the expectation that you’re a high school student preparing for college, just fill in your high school name, note that they will award you a “High School Diploma,” and then go wild on the activities section.
When you enroll in your university of choice, come back and update this section to highlight your university.
If you are in the unusual space of getting an Associate’s degree by means of dual-enrollment, then add that in with the name of the (junior) college that awarded it to you once you have it in hand.
Filling in the Skills
On your profile page, click “Add profile section → Core → Add skills” to start this section. This is a high-maintenance section for you throughout college as almost every course should end with you adding more skills to your list.
- There are all sorts of skills, from conceptual or “soft” skills (interviewing, customer service, A/B testing) to high-process skills that may involve licensing or certification (6 Sigma, ISO 9000) to tools (Python, MS Excel, Salesforce) with a goodly degree of overlap between them (AWS certifications, fluency in a foreign language).
- Skills can be endorsed by your connections, but this is a low-value behavior. One notable example was a person whose most frequently endorsed skill was “Batman.” Again, there are all sorts of skills.
- Where skills are particularly helpful is in the future when your university’s Career Center is helping you look for a good internship, you can see the skills required for a desirable internship and adjust the skills that you do have to exactly match their requirements word-for-word and then try to hustle to acquire the other skills you don’t have yet.
Adding Job (and/or Volunteer) Experience
On your profile page, click “Add profile section → Core → Add position” to start listing jobs you’ve had (or “… → Additional → Add volunteer experience”); the pattern is pretty much the same between them and many employers will treat a strong volunteer position with the same regard as an internship or entry-level job.
- 🛑 Do not overshare. 🛑 The organization you were working for probably exposed you to some of their internal and legally-protected secrets as a matter of process and even if you did amazing work with those secrets, you must not disclose it on LinkedIn. If you are uncertain about what you can say about your work, ask your manager or internship sponsor.
- Other than that, the job descriptions should be comprised of two parts: the skills you used and the benefit the company or institution got from it. For example: “I A/B tested the SNAFU TikTok campaign as provided against my demographic-focused edit, resulting in 30% more engagement from the target audience from provided baseline.” — we see that this person knows A/B testing, analytics, content editing, TikTok, and their audience, and that’s amazing; they’re hired.
- As you have more experiences, internships, and part-time jobs, you’re going to encounter work that you never want to do again. This is fine. Remember that LinkedIn is aspirational, so it’s perfectly acceptable to delete the parts of your history that don’t serve your future.
All About About
Now you are ready to add the About profile section.
- Your about section needs to do 3 things: pull the threads of your brightest highlights up from the experiences that you listed, weave them together with your current ambitions, and stitch it up to your headline.
- Here is an old post about how to write a biographic blurb from Scott Berkun which is relevant for this exercise.
- This section is space-limited to 2600 characters but you probably keep it below 1600. (See Berkun’s first point that “impressive people have short bios.”)
- Only the first 4 lines are going to be visible when your profile loads, so keep your best stuff up top. (See Berkun’s third point about “invert your pyramid.”)
This is the hard part of this exercise, so take your time with it and update it whenever you update your headline.
Change Your URL
By default, the web address for your LinkedIn profile is going to end in your name followed by a ridiculous number. Clicking “Public profile & URL” in the upper right corner of your profile allows you to change it. Ideally you can just remove the number from your URL because your name clearly identifies you. But if you’re one of the thousands of “Jason Miller”s then you may need to inject a middle initial or append a professional descriptor, like https://www.linkedin.com/in/jason-miller-iec
Note that your personalized URL can be updated again in the future and all of these URLs are (pretty) durable so you don’t have to worry much about stale business cards with old LinkedIn addresses.
Additional Stuff
That’s all you really need to get your profile started. Additional sections of note include:
- Languages, if you’ve got a tested level of proficiency. They also allow you to post a DuoLingo score but we will not be dignifying those gamified clankers here.
- Publications, as will be important if you are aiming for research accolades to get into grad school — though I have known some younger students with legitimate publications as well. (This is also true of Awards, et cetera.)
- Featured is the name of a resources section pinned near the top of your profile. When you are proud of a paper or have a YouTube video that is the pinnacle of your accomplishment, et cetera, you can showcase them here. This is important for students and researchers, but not necessarily a thing you start using on the first day of being on LinkedIn.
Using LinkedIn (Particularly Pre-Professionally)
Moving past getting started with LinkedIn to getting some use out of it, here’s what you should be looking to do next before you have a college Career Center you can ask for further advice.
What to Follow, Who to Connect With
LinkedIn has two modes of associating with other accounts: Connect or Follow. Connecting is automatically mutual (like the Facebook Friend), Following is just you following them (like the Instagram Follow).
- Follow the colleges that you are applying to to boost your Demonstrated Interest marker. Follow the college organizations and clubs (inclusive of Honors Colleges!) that are relevant to your particular interests at your most-preferred schools if they have set up LinkedIn pages.
- Do clean out your spurious Follows after you’ve enrolled in a specific college. You may re-establish cross-university affiliations later, but start those off in-person.
- Note that it may look odd (if anybody’s paying close attention) for you to be 🚩following many colleges when applying Early Decision to just one.🚩 Curate your Follow list accordingly.
- Follow the high-status, good-reputation companies and organizations that you’d be keen to accept internship offers from in the future. Much as colleges often look for Demonstrated Interest to ensure their work to make an offer will yield results, recruiters will also use your following of a company as a signal of your demonstrated interest in that company.
- I do not recommend Following people on LinkedIn at this time. Other social media platforms are generally preferred for that sort of asymmetric relationship.
But Connecting to people on LinkedIn is a good and valuable thing to do. There are three-and-a-half sorts of connections you want to make:

- Advocates. These are generally your peers and your baseline LinkedIn relationship will be putting supportive reactions on each other’s posts to mutually boost algorithmic engagement. While these relationships may become more valuable Strategic Ins or Subject Matter Experts in the future, expect that most of the people you’ll be Connecting to in college will be Advocates.
- Strategic Ins. These are people who have more social capital than you do, and you want some degree of access to what they’ve got. These are the professors, bosses, senior co-workers, et cetera who control or will introduce you to the people controlling the internships, jobs, grants, laboratories, podcasts, think tanks, et cetera that you want to know your name and — importantly — be thinking of you as “available.”
- Every successful internship should result in your manager/boss/sponsor becoming a Connection who will be a Strategic In for you in the future and provide you with a durable Recommendation (see below).
- Subject Matter Experts. These tend to be the people you’d merely Follow on other platforms, but on LinkedIn we expect more mutuality. For where you’re at, these are the academics doing work that you find interesting (and cite in papers!), perhaps see presenting at conferences or trade shows, and you might like to have on a podcast when you briefly try your hand at podcasting in spring of your Freshman year (because everybody does).
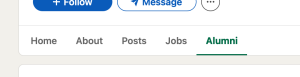
- Alumni Mentors. This is the special one that you’ll add into the mix after you’re well-established at your college. On LinkedIn, all the colleges have an “Alumni” tab on their page (example), and you can use that tab to find people who are on the life-trajectory you’re pursuing, perhaps by major (who will convert to Subject Matter Experts) or by company/institution you’d like to work with (converting them to Strategic Ins).
Final thoughts on building out your social connections on LinkedIn:
- When making a Connection request, it’s good to attach a note to remind the recipient that they do, in real life, know who you are. LinkedIn is a bit restrictive on the use of Connection notes for free accounts, so if you get a quota warning then save the notes for your Subject Matter Experts and Alumni Mentors, preferring to tell your Advocates and Strategic Ins that you’ll Connect to them in LinkedIn in person (just like you start your request for a teacher’s letter of recommendation in-person).
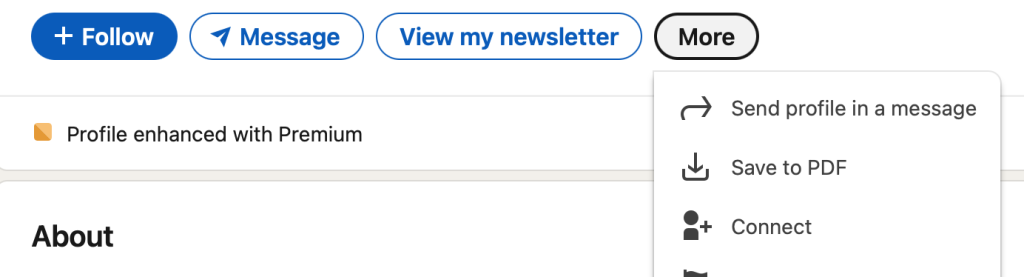
- You may not always see a Connect button on some people’s profiles. It’s there, but it’s tucked under the “More” button as seen below.
Getting Recommendations
Just like we request a recommendation from a teacher (first in person and then electronically, with a slight prompt to steer it towards where we want to go), so should you make a habit of asking managers and professors for recommendations at the end of internships or major projects.
- Add the recommendations section to your profile: “Add profile section → Recommended → Add recommendations”
- On your profile, you’ll then be able to use the “+” at the top of the Recommendations section to request (or give) a recommendation.
- When you receive a recommendation, you’ll have a chance to review it before approving it to be attached to your profile.
A well-written recommendation carries far more weight than a mere skill endorsement for the recruiters who are searching for somebody just like you.
Of course, you should also be prepared for your teammates and co-workers to request recommendations from you. I get that writing these can be quite awkward, but keeping a Gratitude Journal over time (recommended for other reasons, too) may provide you with a history of specific personal interactions you can aggregate into a recommendation for them.
Tagging Yourself for Recruitment
I have not been talking about how to search for jobs on LinkedIn here — prefer the advice of your college’s Career Center, that’s what it’s there fore — but there is an important Preferences setting you should adjust in the Jobs section of LinkedIn (via the top menu, see screenshot), and that is “Open to work.”

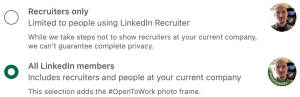
LinkedIn has three basic states for you to be approaching the job market, seen in the “Open to work” option under preferences. These are:
- Off, for when you’re too busy to even consider opportunities,
- showing the banner to Recruiters only, for when you’re currently working but want to consider future possibilities,
- or showing the banner to All LinkedIn members to indicate that you’re at or past the end of a job and are actively looking for your next big thing.
While you have many toggles (importantly for you: the ability to specify “internship” in the type of job ✅) within the “Open to work” menu, the banner visibility at the bottom of that menu is the single most visible indicator of your receptivity to job offers. That said: Recruiters will absolutely filter their candidate lists based on who shows up as being “Open to work,” so as a student you’re probably going to want to leave this on by default even if you leave the banner off.
Do remember to update your “Open to work” status after you accept a job or internship.
Using Your Feed to Poke the Algorithm
Finally, it is helpful to signal your engagement to the internal LinkedIn algorithms so they’ll (theoretically) elevate you in search results for recruiters et al. The easiest way to do this is putting material on your feed. But! Remember that this is LinkedIn so the tone is expected to be professionally aspirational (and future-looking). What sort of content might you, a mere student, produce that meets this criterion?
- As an incoming nerdling student, you can post the occasional (positive!) brief review of a book or paper that you liked. Figuring out how to blurb a book or paper down is critical to doing a Literature Review, a common academic activity in paper-writing. Bonus points if you can arrange with friends (Advocates!) to leave constructive comments you can respond to as the 2025 algorithm is currently favoring that sort of ongoing engagement.
- Once you start writing papers, make a point to thank the authors of your favorite references for their work (mention that you cited it). Academics love to know their work is being read and appreciated and this might even be a way to make connections with Subject Matter Experts — it worked for me while I was in grad school!
- As you start getting involved in professionally-relevant clubs that will be hosting activities, make a point of advertising those activities — and your involvement with the club — on your feed.
- If your work, particularly collaborative projects, gains recognition from your professor or school, acknowledge that and thank them for the opportunity on your feed.
- And do put when you enroll in college, graduate from college, and start jobs/internships on your feed.
You don’t need many posts to show the algorithm that you have a pulse — aim for just one per week or every other week, it’ll be fine. Conversely, try to avoid adding AI slop or other (“got a virtual certificate”) frivolities to your feed: they are distracting and therefore counterproductive.
Finally: Clean Up After Yourself
Again, remembering that this is LinkedIn so the tone is expected to be professionally aspirational and future-looking, make a point to come back to your profile and strip off material that is outmoded by subsequent life events. After you graduate from college, your outmoded high school information (“AP English score: 5”) stops being particularly relevant to your future. Likewise for the jobs you’ll never go back to (“grading papers for the computer science department”) and the skills you’ll never use again (“Microsoft BizTalk 2002”) once you start progressing on your particular career.